Thursday, November 3, 2016

QoS Enhacements in CUCM 11.X

  • These were added in CUCM v11
  • The main enhancements are:
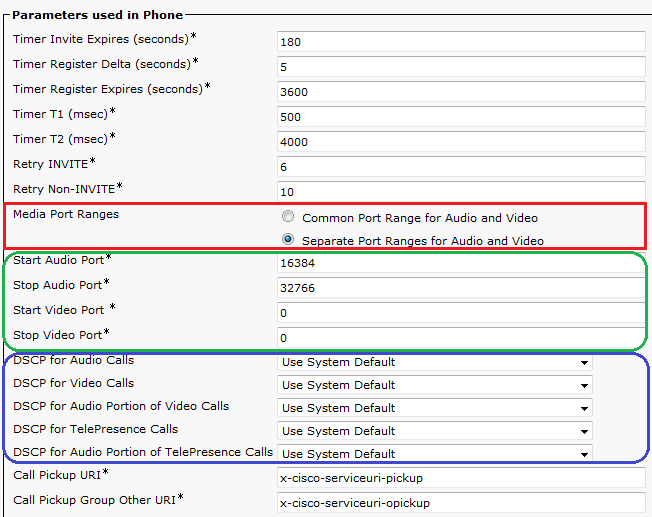
    • Separating UDP Port Ranges for Audio and Video
    • Separating DSCP Markings for Audio and Video streams in Video Calls
      • You can have separate markings for audio in Telepresence video call than Fixed video call
  • Navigate to Device > Device Settings > SIP Profile.
  • Current endpoints which support this enhancement (03/11/2016)
Video Endpoint
DSCP for Audio Portion of Video Calls
DSCP for Audio Portion of TelePresence Calls
8800 Series
Yes
N/A
8900 Series
No
N/A
9900 Series
No
N/A
Jabber
Yes (Jabber for Windows uses Group Policy Objects to mark traffic on the PC else DSCP will be set to '0'. All other Jabber clients are able to mark DSCP natively)
No
DX Series
Yes
Yes
TX Series
N/A
Yes
IX Series
N/A
No
CE 8.x Software Series (SX Series, MX Series G2, MX700, MX800)
N/A
Yes
TC 7.1.4 Software Series (C Series, Profile Series, EX Series, MX Series G1)
N/A
Yes
EX Series (TC Software)
N/A
Yes

  • Restrictions
    • These features are supported on SIP endpoints Only
    • For Jabber Softphones, only separate UDP ports can be used. This is because Windows OS doesn’t allow DSCP markings natively (can be fixed by registry tweak or using GPO)
    • Prior to this feature, Jabber Client will divide the RTP Port Range received in TFTP File into two splits. Lower half will be used for audio and upper half will be used for video

Enable DSCP Markings on Windows OS (7, 8, 10)

By default windows OS will set DSCP markings to '0' ignoring the marking settings on the client. This can be good and bad.

A good scenario is to make sure that torrent clients aren't getting priority (while ideally your enterprise network qos policies should overcome this problem as well)

A bad scenario is overriding DSCP markings from Jabber Client which marks packets genuinely  for seperating audio and video streams treatment.

While you can still overcome the problem of Jabber Client using network QoS policies, you can allow QoS marking on windows OS as follow:

1. Go to HKLM\System\CurrentControlSet\Services\Tcpip\QoS. If "QoS" folder doesn't exist there - create it.
2. Add a DWORD parameter named "Do not use NLA" and assign "1" as its value.
3. Reboot.


Tuesday, November 1, 2016

Notes on Self-Service ID


  • The Self-Service User ID is generate automatically once the primary extension is assigned to the End User
    • The Primary extension can be assigned manually, using LDAP or using BAT
    • For LDAP Self-Service IDs it will be generated during the 1st LDAP sync (not on LDAP update)
  • Self-Service ID will be generated only if the user doesn't have one
  • For upgrades from Pre-10.x to 10.x, Self-Service ID will be generated for users with Primary Extensions
  • When same DN is assigned to multiple partitions and to multiple users as primary extension, Self-Service ID will be made unique by prefixing a code of *01, *02, etc
  • You can change the Self-Service ID, manually from End User configuration page

LDAP Enhancements in CUCM


  • CUCM can synchronize users and groups from LDAP
    • Introduced in version 11
    • LDAP Filter can be created for users and groups
    • Primary use to have Active Directory groups available in the Cisco Jabber contact list
  • CUCM can assign Access Control Groups to LDAP users from synchronization Agreement
  • CUCM can assign Feature Group Template to LDAP users from synchronization Agreement
    • This will assign User Profile to synched user which includes UDT and ULT
    • This will assign Service Profile to synched user which include UC Services (IMP, CUC, etc for jabber)
    • This will configure user settings such as Enable Mobility, Enable EMCC, Allow End User to Host Conference Now
    • This will allow user to run Self-Provisioning
  • CUCM can create DNs for LDAP users and assign them as primary extension using the option Apply mask to synced telephone numbers to create a new line for inserted users
    • The DNs will be based on the TelephoneNumber or ipPhone attributes configured in AD
    • A mask can be applied to these attributes to manipulate the created DNs
    • In case the synched users are missing phone numbers, CUCM can allocate DNs dynamically from pre-configured pool using the option Assign new line from the pool list if one was not created based on a synced LDAP telephone number
  • Navigate to System > LDAP > LDAP Search to integrate CUCM environment with LDAP Environment without synchronization
    • This feature will enable all endpoints and Cisco mobile and remote access clients in the enterprise to perform user searches against an enterprise directory server, even if those endpoints and clients are operating outside the enterprise firewall

CUCM Self-Provisioning


  • This feature allow end-users or administrators to provision phones with minimum admin work
  • It was introduced with CUCM 10.x
  • The users need to follow the prompts on the phones to login to CUCM which will auto-provision the phones
  • How it works?
    • The phone auto-registers with CUCM
    • During auto-registration it gets an idle URL.
    • This idle URL points the phone to self-provision XPS resource running on CUCM
    • Once the phone contacts the XPS resource, it will be prompted for user ID/pin
    • From here there are two approaches to complete Self-Provisioning
      • Option#1
        • When the users enter the user ID and PIN, they are authenticated with the CM and their primary extension is determined
        • The users are then prompted to confirm that they wish to provision the phone using their primary extension. If they confirm, the phone will be provisioned and reset
      • Option#2
        • The users can call Self-Provision IVR
        • The users need to enter Self-Service ID and PIN
        • Upon confirmation, the phone will be provisioned using the End User Primary Extension
  • To disable self-provisioning, delete the idle URL from phones configuration, enterprise parameters, auto-registration Universal Device Template (UDT)
  • To configure Self-Provisioning
    • Verify UDT assigned to System > Cisco Unified CM > Auto Registration Information > Universal Device Template.
    • Navigate to User Management > User/Phone Add > Universal Line Template > Add New
      • Assign default Partition and CSS to be used for self-provisioned DN
      • Configure other settings such as Call Forwarding, Enterprise Alternate Number, +E164 Alternate Number
    • Configure auto-registration settings under System > Cisco Unified CM > Auto Registration Information
      • Assign UDT, ULT and Starting/Ending Directory Numbers
    • Navigate to User Management > Self-Provisioning and configure the authentication method for end users to run self-provisioning
      • Require Authentication
      • No Authentication: In this mode the end users need to enter the username which will trigger the provisioning without a need for PIN/Password
    • Navigate to User Management > User Settings > User Profile > Add New
      • This user profile will be used to configure the device and line settings of the phone during self-provisioning
      • Assign UDT for Desk Phones, Mobile and Desk Devices and RDP
      • Assign ULT
      • Enable Allow End User to Provision their own phones and set the max number of phones to be self-provision
    • Navigate to User Management > User/Phone Add > Feature Group Template > Add New
      • This is used with users synced from AD or users added using quick add feature
      • It will assign Users Profile to synced users
      • It will assign Service Profile to synced users
      • It will configure users settings for synced users such as Enable IM and Presence, Enable Mobility, Enable EMCC, Enable End User to Host Conference Now
    • Add End User
      • The main parameters in end user settings needed for self-provisioning are:
        • User Profile
        • Primary Extension
      • In case the End Users are synced from AD or added using Quick Add, the User Profile will be synched using Feature Group Template
        • Primary extension should be created manually in case of Quick Add or synched automatically in case of AD
      • In case the End Users are added manually, these parameters needs to be assigned manually.
    • Setup Self-Provision IVR
      • Configure CTI Route Point which can be dialed from Auto-Registeration CSS
      • Configure Application User with Standard CCM EndUser and Standard CTI Enabled access control groups
      • Associate the CTI Route Point as controlled device to Application User
      • Navigate to User Management > Self-Provision and assign the CTI Route Point and Application User
  • Troubleshooting Self-Provision IVR
    • IVR Component runs on Publisher Node Only (it doesn’t run on Subscribers)
    • If auto-registered phone doesn't get the configured Phone Button Template in UDT, make sure that Auto Registration Legacy Mode is False in the Enterprise Parameters
      • This setting will disable UDT for auto-registration and fallback to Device Defaults
    • Any change in the Application User or CTI Route Point needs a restart of IVR Self-Provisioning service
    • If the auto-registered phone can't dial CTI Route Point DN, ensure that the region bandwidth between CTI and Phone is greater than 8000

DNS Performance Troubleshooting

When you are troubleshooting internet performance, there are different parts of the connection should be verified:   ·         DNS Pe...